{{auteur}}
{{mots d'extrait = "100"}} ... Lire la suite
{{{pagination}}}
{{/si}} le plateforme de blog Ghost a récemment attiré beaucoup d'attention en raison de son récent passage de la version bêta à la version publique (si vous n'en avez pas encore entendu parler, aller par ici et lisez).
Comme les autres plates-formes, Ghost prend en charge les «thèmes» tiers. Dans cet article, nous allons concevoir un blog simple, réactif et axé sur le contenu. Ensuite, codez-le dans un thème entièrement fonctionnel pour Ghost.
Le thème par défaut de Ghost, «Casper», est très propre. Ils mettent le contenu en premier, en montrant la typographie avec une palette de couleurs moderne, de sorte que l'accent est mis sur l'écriture.
Nous allons suivre cette piste, donc notre processus de conception doit commencer par comprendre comment Ghost fonctionne et ce qui est disponible pour l'utilisateur dans le back-end. Il y a 4 éléments principaux sur lesquels nous pourrons puiser en arrière-plan lors de la conception du thème (hormis les articles / articles eux-mêmes évidemment) qui sont:
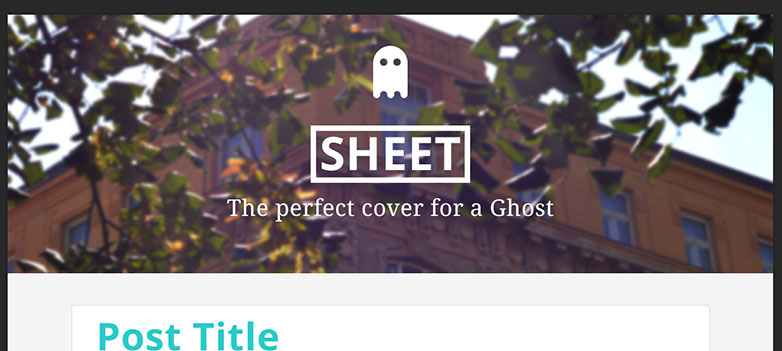
Tout cela peut être défini dans l'onglet Paramètres de Ghost. Celles-ci dirigent la conception dans une direction évidente d'une sorte de bannière en haut de la page, qui contient le titre, le logo et la description et une image de fond en arrière-plan.
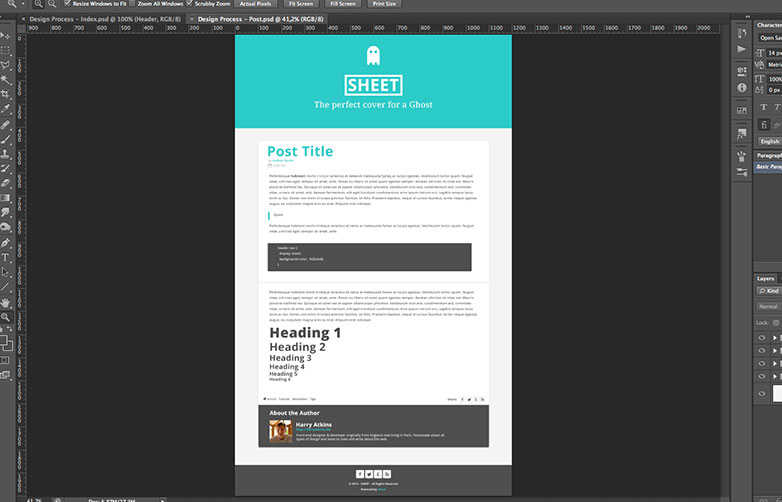
Il suffit donc de concevoir 2 pages, c'est-à-dire la page d'accueil, qui affiche tous les derniers messages, et la page de publication individuelle. Comme la conception est relativement simple, je montrerai d'abord la page finie, puis revisiterai les détails. Voici donc la page d'accueil qui affiche les derniers messages:

Donc, comme vous pouvez le voir, les reflets colorés, avec un design simple et net. Reprenons les détails à nouveau. Nous avons donc l'en-tête, qui contient le logo (ici j'ai fait un petit costume de feuille pour un fantôme), le nom du blog et la description.
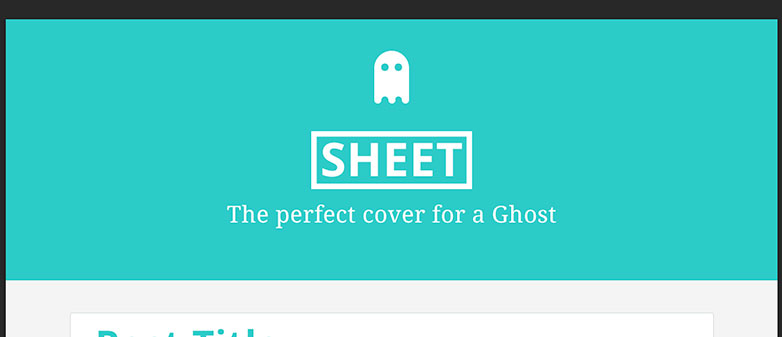
Donc, si l’utilisateur choisit une photo de couverture, nous l’inclurons ici en tant qu’image de fond pleine largeur. Sinon, nous choisirons une couleur bleue unie qui sera notre couleur de surbrillance comme ci-dessus.
Ensuite, nous avons des boîtes de contenu dans lesquelles nous afficherons toutes les informations sur chaque publication (titre, date de publication, auteur, balises) et l'extrait.
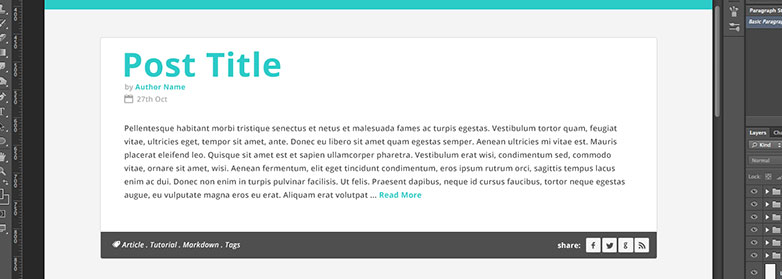
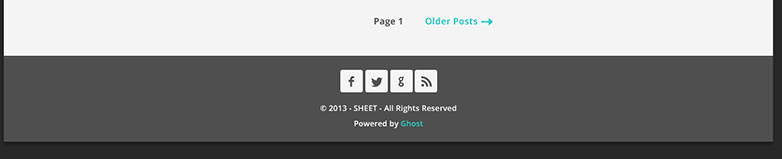
Enfin, nous faisons un simple lien de pagination et un pied de page. Dans la zone de partage d'article, le pied de page et tout le site, nous utilisons une police d'icône personnalisée créée à Fontello et la police Ouvert sans à partir de Google Web Fonts. Que nous verrons comment mettre en œuvre plus tard.
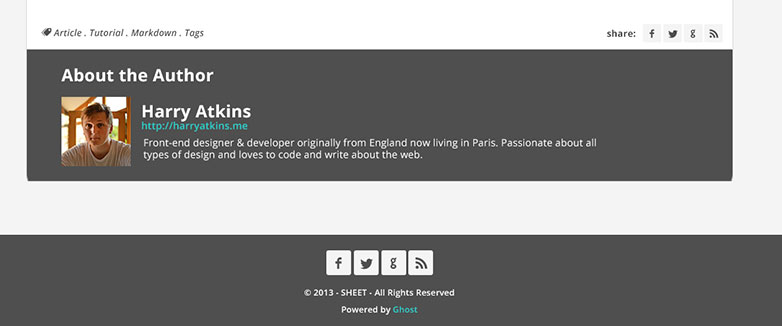
Cette conception est très similaire à la page d'accueil. Sauf que le bloc dans lequel nous avons joint l’extrait avant s’étendra maintenant sur toute la hauteur et affichera tout le contenu. De plus, nous ajouterons une boîte auteur en bas.
Donc, tout est pareil, mis à part un style de texte en ligne que nous allons aborder en phase de développement. Et voici la nouvelle boîte auteur:
Ok, alors maintenant, le design a été examiné (et de toute évidence le personnaliser selon vos préférences). Il est temps de commencer le développement. Tout d'abord, si vous ne l'avez pas déjà fait, prenez une seconde et lisez le Ghost officiel documentation sur la création du thème. Ils sont très clairs et concis sur ce qui est nécessaire et la structure des fichiers, etc. Pour ce tutoriel, nous pouvons diviser le développement en deux étapes. Contenu et style Comme une relation de base entre HTML et CSS, nous allons faire fonctionner le thème, puis le faire ressembler à notre conception.
Pour commencer, vous devez avoir installé Ghost sur votre machine. Ceci est relativement simple à faire, et il y a maintenant même des installateurs automatiques (comme celui-là ). Une fois qu'il est installé et en cours d'exécution, vous devez trouver le dossier fantôme nommé "ghost-version.number" (au moment de l'écriture, il s'agit de "ghost-0.3.2"). Une fois localisé, accédez à 'content / themes', vous voudrez créer un nouveau dossier portant le nom de votre thème. Donc, dans ce cas, nous l'appellerons «feuille». Dans ce dossier, nous allons créer 2 fichiers essentiels pour un thème Ghost. C'est 'index.hbs' et 'post.hbs', si vous avez lu la documentation de Ghost (ou si vous avez déjà utilisé des Handlebars ailleurs), vous reconnaîtrez le format de fichier '.hbs', ce qui signifie que nous pouvons utiliser le 'guidon' : {{}} dans notre modèle.
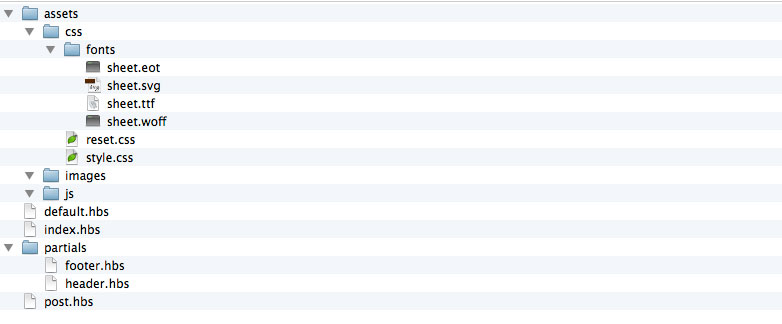
Après cela, nous ajouterons un autre fichier appelé «default.hbs» et une structure de dossiers pour nos fichiers et fichiers actifs. Suivez cette structure de fichier:
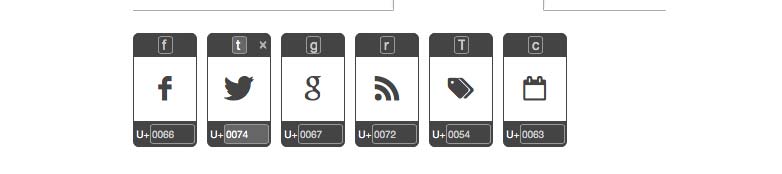
Dans «assets / css / fonts», nous placerons nos fichiers de polices d'icônes pour l'implémentation de @ font-face. Pour cette conception, j'ai seulement choisi 6 icônes: Facebook, Twitter, Google, RSS, Tags, Calendrier.
En dehors de cela, le reste des fichiers est assez explicite. Maintenant, entrons dans le code. Nous allons d'abord examiner les deux fichiers essentiels du thème.
En ce qui concerne les conceptions, je donnerai tout le contenu du fichier en premier, puis nous diviserons les bits importants. Tout d'abord le fichier 'index.hbs':
{{!< default}}{{> header}}{{#foreach posts}}{{auteur}}
{{mots d'extrait = "100"}} ... Lire la suite
{{/ foreach}} {{# si pagination}} {{{pagination}}} {{/si}} {{> footer}} So to explain what's happening, the very first line is essential to the theme and tell us that this file will be inserted into the content area into the default file. The second line then inserts our header. Instead of putting it into this file we'll create a partial file later in the 'partials' directory. HBS files are just like HTML files in which you can include normal HTML elements. So the next element in the file is a which will hold all of our main content. Then inside of the repeater we'll put our article element that will contain the post. Inside each there will be a with the title and the meta data of the article (author and publish date). After that the actual excerpt. Then a that has our post's tags (in between an 'if' statement) and the share links, with some span's calling in our icon font. Finally we have some pagination, and we eventually call in the which works like the header. So as you can see it's relatively simple code. Obviously any class or ID names are optional for CSS styling. Next up comes the 'post.hbs' file. Which is mostly similar, but with a few additions and modifications. /">← Go Back {{title}} by {{author}} {{date format='DD MMM YYYY'}} {{content}} {{#if tags}} Tags: {{tags separator=" . "}} {{/if}} Share: {{#if author}} About the Author {{#if author.image}} {{/if}} {{author.name}} {{#if author.website}} {{author.website}} {{/if}} {{author.bio}} {{/if}}{{/post}} {{> footer}} Once again we have the and handlebars. And our element. But this time the wrapping handlebar is Then we call in the (Not excerpt, because this is the individual page we want to show all of the content in the post.) Another difference here is the 'if' statement which is verifying if there's an author for the post. If there is we'll show a box with the author's image, name, URL and bio. All of these elements are editable in the back-end by the user, and will either show up or not depending on whether they exist. 'default.hbs' and the partial files Now we're going to look at the default.hbs file. So if you haven't made it yet, create a new file. In that file we're going to put all the default things that are needed for our page to display correctly in a browser, mainly the doctype and the , and tags. {{ghost_head}} {{{body}}} {{ghost_foot}}
{{!< default}} So to explain what's happening, the very first line is essential to the theme and tell us that this file will be inserted into the content area into the default file. The second line then inserts our header. Instead of putting it into this file we'll create a partial file later in the 'partials' directory. HBS files are just like HTML files in which you can include normal HTML elements. So the next element in the file is a which will hold all of our main content. Then inside of the repeater we'll put our article element that will contain the post. Inside each there will be a with the title and the meta data of the article (author and publish date). After that the actual excerpt. Then a that has our post's tags (in between an 'if' statement) and the share links, with some span's calling in our icon font. Finally we have some pagination, and we eventually call in the which works like the header. So as you can see it's relatively simple code. Obviously any class or ID names are optional for CSS styling. Next up comes the 'post.hbs' file. Which is mostly similar, but with a few additions and modifications. /">← Go Back {{title}} by {{author}} {{date format='DD MMM YYYY'}} {{content}} {{#if tags}} Tags: {{tags separator=" . "}} {{/if}} Share: {{#if author}} About the Author {{#if author.image}} {{/if}} {{author.name}} {{#if author.website}} {{author.website}} {{/if}} {{author.bio}} {{/if}}{{/post}} {{> footer}} Once again we have the and handlebars. And our element. But this time the wrapping handlebar is Then we call in the (Not excerpt, because this is the individual page we want to show all of the content in the post.) Another difference here is the 'if' statement which is verifying if there's an author for the post. If there is we'll show a box with the author's image, name, URL and bio. All of these elements are editable in the back-end by the user, and will either show up or not depending on whether they exist. 'default.hbs' and the partial files Now we're going to look at the default.hbs file. So if you haven't made it yet, create a new file. In that file we're going to put all the default things that are needed for our page to display correctly in a browser, mainly the doctype and the , and tags. {{ghost_head}} {{{body}}} {{ghost_foot}}
{{> header}} So to explain what's happening, the very first line is essential to the theme and tell us that this file will be inserted into the content area into the default file. The second line then inserts our header. Instead of putting it into this file we'll create a partial file later in the 'partials' directory. HBS files are just like HTML files in which you can include normal HTML elements. So the next element in the file is a which will hold all of our main content. Then inside of the repeater we'll put our article element that will contain the post. Inside each there will be a with the title and the meta data of the article (author and publish date). After that the actual excerpt. Then a that has our post's tags (in between an 'if' statement) and the share links, with some span's calling in our icon font. Finally we have some pagination, and we eventually call in the which works like the header. So as you can see it's relatively simple code. Obviously any class or ID names are optional for CSS styling. Next up comes the 'post.hbs' file. Which is mostly similar, but with a few additions and modifications. /">← Go Back {{title}} by {{author}} {{date format='DD MMM YYYY'}} {{content}} {{#if tags}} Tags: {{tags separator=" . "}} {{/if}} Share: {{#if author}} About the Author {{#if author.image}} {{/if}} {{author.name}} {{#if author.website}} {{author.website}} {{/if}} {{author.bio}} {{/if}}{{/post}} {{> footer}} Once again we have the and handlebars. And our element. But this time the wrapping handlebar is Then we call in the (Not excerpt, because this is the individual page we want to show all of the content in the post.) Another difference here is the 'if' statement which is verifying if there's an author for the post. If there is we'll show a box with the author's image, name, URL and bio. All of these elements are editable in the back-end by the user, and will either show up or not depending on whether they exist. 'default.hbs' and the partial files Now we're going to look at the default.hbs file. So if you haven't made it yet, create a new file. In that file we're going to put all the default things that are needed for our page to display correctly in a browser, mainly the doctype and the , and tags. {{ghost_head}} {{{body}}} {{ghost_foot}}
{{/if}} {{author.name}} {{#if author.website}} {{author.website}} {{/if}} {{author.bio}} {{/if}}{{/post}} {{> footer}} Once again we have the and handlebars. And our element. But this time the wrapping handlebar is Then we call in the (Not excerpt, because this is the individual page we want to show all of the content in the post.) Another difference here is the 'if' statement which is verifying if there's an author for the post. If there is we'll show a box with the author's image, name, URL and bio. All of these elements are editable in the back-end by the user, and will either show up or not depending on whether they exist. 'default.hbs' and the partial files Now we're going to look at the default.hbs file. So if you haven't made it yet, create a new file. In that file we're going to put all the default things that are needed for our page to display correctly in a browser, mainly the doctype and the , and tags. {{ghost_head}} {{{body}}} {{ghost_foot}}
{{#foreach posts}} So to explain what's happening, the very first line is essential to the theme and tell us that this file will be inserted into the content area into the default file. The second line then inserts our header. Instead of putting it into this file we'll create a partial file later in the 'partials' directory. HBS files are just like HTML files in which you can include normal HTML elements. So the next element in the file is a which will hold all of our main content. Then inside of the repeater we'll put our article element that will contain the post. Inside each there will be a with the title and the meta data of the article (author and publish date). After that the actual excerpt. Then a that has our post's tags (in between an 'if' statement) and the share links, with some span's calling in our icon font. Finally we have some pagination, and we eventually call in the which works like the header. So as you can see it's relatively simple code. Obviously any class or ID names are optional for CSS styling. Next up comes the 'post.hbs' file. Which is mostly similar, but with a few additions and modifications. /">← Go Back {{title}} by {{author}} {{date format='DD MMM YYYY'}} {{content}} {{#if tags}} Tags: {{tags separator=" . "}} {{/if}} Share: {{#if author}} About the Author {{#if author.image}} {{/if}} {{author.name}} {{#if author.website}} {{author.website}} {{/if}} {{author.bio}} {{/if}}{{/post}} {{> footer}} Once again we have the and handlebars. And our element. But this time the wrapping handlebar is Then we call in the (Not excerpt, because this is the individual page we want to show all of the content in the post.) Another difference here is the 'if' statement which is verifying if there's an author for the post. If there is we'll show a box with the author's image, name, URL and bio. All of these elements are editable in the back-end by the user, and will either show up or not depending on whether they exist. 'default.hbs' and the partial files Now we're going to look at the default.hbs file. So if you haven't made it yet, create a new file. In that file we're going to put all the default things that are needed for our page to display correctly in a browser, mainly the doctype and the , and tags. {{ghost_head}} {{{body}}} {{ghost_foot}}
{{/if}} {{author.name}} {{#if author.website}} {{author.website}} {{/if}} {{author.bio}} {{/if}}{{/post}} {{> footer}} Once again we have the and handlebars. And our element. But this time the wrapping handlebar is Then we call in the (Not excerpt, because this is the individual page we want to show all of the content in the post.) Another difference here is the 'if' statement which is verifying if there's an author for the post. If there is we'll show a box with the author's image, name, URL and bio. All of these elements are editable in the back-end by the user, and will either show up or not depending on whether they exist. 'default.hbs' and the partial files Now we're going to look at the default.hbs file. So if you haven't made it yet, create a new file. In that file we're going to put all the default things that are needed for our page to display correctly in a browser, mainly the doctype and the , and tags. {{ghost_head}} {{{body}}} {{ghost_foot}}
{{/if}} {{author.name}} {{#if author.website}} {{author.website}} {{/if}} {{author.bio}} {{/if}}{{/post}} {{> footer}} Once again we have the and handlebars. And our element. But this time the wrapping handlebar is Then we call in the (Not excerpt, because this is the individual page we want to show all of the content in the post.) Another difference here is the 'if' statement which is verifying if there's an author for the post. If there is we'll show a box with the author's image, name, URL and bio. All of these elements are editable in the back-end by the user, and will either show up or not depending on whether they exist. 'default.hbs' and the partial files Now we're going to look at the default.hbs file. So if you haven't made it yet, create a new file. In that file we're going to put all the default things that are needed for our page to display correctly in a browser, mainly the doctype and the , and tags. {{ghost_head}} {{{body}}} {{ghost_foot}}
{{> footer}} So to explain what's happening, the very first line is essential to the theme and tell us that this file will be inserted into the content area into the default file. The second line then inserts our header. Instead of putting it into this file we'll create a partial file later in the 'partials' directory. HBS files are just like HTML files in which you can include normal HTML elements. So the next element in the file is a which will hold all of our main content. Then inside of the repeater we'll put our article element that will contain the post. Inside each there will be a with the title and the meta data of the article (author and publish date). After that the actual excerpt. Then a that has our post's tags (in between an 'if' statement) and the share links, with some span's calling in our icon font. Finally we have some pagination, and we eventually call in the which works like the header. So as you can see it's relatively simple code. Obviously any class or ID names are optional for CSS styling. Next up comes the 'post.hbs' file. Which is mostly similar, but with a few additions and modifications. /">← Go Back {{title}} by {{author}} {{date format='DD MMM YYYY'}} {{content}} {{#if tags}} Tags: {{tags separator=" . "}} {{/if}} Share: {{#if author}} About the Author {{#if author.image}} {{/if}} {{author.name}} {{#if author.website}} {{author.website}} {{/if}} {{author.bio}} {{/if}}{{/post}} {{> footer}} Once again we have the and handlebars. And our element. But this time the wrapping handlebar is Then we call in the (Not excerpt, because this is the individual page we want to show all of the content in the post.) Another difference here is the 'if' statement which is verifying if there's an author for the post. If there is we'll show a box with the author's image, name, URL and bio. All of these elements are editable in the back-end by the user, and will either show up or not depending on whether they exist. 'default.hbs' and the partial files Now we're going to look at the default.hbs file. So if you haven't made it yet, create a new file. In that file we're going to put all the default things that are needed for our page to display correctly in a browser, mainly the doctype and the , and tags. {{ghost_head}} {{{body}}} {{ghost_foot}}
So to explain what's happening, the very first line is essential to the theme and tell us that this file will be inserted into the content area into the default file. The second line then inserts our header. Instead of putting it into this file we'll create a partial file later in the 'partials' directory. HBS files are just like HTML files in which you can include normal HTML elements. So the next element in the file is a which will hold all of our main content. Then inside of the repeater we'll put our article element that will contain the post. Inside each there will be a with the title and the meta data of the article (author and publish date). After that the actual excerpt. Then a that has our post's tags (in between an 'if' statement) and the share links, with some span's calling in our icon font. Finally we have some pagination, and we eventually call in the which works like the header. So as you can see it's relatively simple code. Obviously any class or ID names are optional for CSS styling. Next up comes the 'post.hbs' file. Which is mostly similar, but with a few additions and modifications. /">← Go Back {{title}} by {{author}} {{date format='DD MMM YYYY'}} {{content}} {{#if tags}} Tags: {{tags separator=" . "}} {{/if}} Share: {{#if author}} About the Author {{#if author.image}} {{/if}} {{author.name}} {{#if author.website}} {{author.website}} {{/if}} {{author.bio}} {{/if}}{{/post}} {{> footer}} Once again we have the and handlebars. And our element. But this time the wrapping handlebar is Then we call in the (Not excerpt, because this is the individual page we want to show all of the content in the post.) Another difference here is the 'if' statement which is verifying if there's an author for the post. If there is we'll show a box with the author's image, name, URL and bio. All of these elements are editable in the back-end by the user, and will either show up or not depending on whether they exist. 'default.hbs' and the partial files Now we're going to look at the default.hbs file. So if you haven't made it yet, create a new file. In that file we're going to put all the default things that are needed for our page to display correctly in a browser, mainly the doctype and the , and tags. {{ghost_head}} {{{body}}} {{ghost_foot}}
{{!< default}}{{> header}}{{#post}}{{{url}}}">{{title}} by {{author}} {{date format='DD MMM YYYY'}} {{content}} {{#if tags}} Tags: {{tags separator=" . "}} {{/if}} Share: {{#if author}} About the Author {{#if author.image}} {{/if}} {{author.name}} {{#if author.website}} {{author.website}} {{/if}} {{author.bio}} {{/if}}{{/post}} {{> footer}} Once again we have the and handlebars. And our element. But this time the wrapping handlebar is Then we call in the (Not excerpt, because this is the individual page we want to show all of the content in the post.) Another difference here is the 'if' statement which is verifying if there's an author for the post. If there is we'll show a box with the author's image, name, URL and bio. All of these elements are editable in the back-end by the user, and will either show up or not depending on whether they exist. 'default.hbs' and the partial files Now we're going to look at the default.hbs file. So if you haven't made it yet, create a new file. In that file we're going to put all the default things that are needed for our page to display correctly in a browser, mainly the doctype and the , and tags. {{ghost_head}} {{{body}}} {{ghost_foot}}
So to explain what's happening, the very first line is essential to the theme and tell us that this file will be inserted into the content area into the default file. The second line then inserts our header. Instead of putting it into this file we'll create a partial file later in the 'partials' directory. HBS files are just like HTML files in which you can include normal HTML elements. So the next element in the file is a which will hold all of our main content. Then inside of the repeater we'll put our article element that will contain the post. Inside each there will be a with the title and the meta data of the article (author and publish date). After that the actual excerpt. Then a that has our post's tags (in between an 'if' statement) and the share links, with some span's calling in our icon font. Finally we have some pagination, and we eventually call in the which works like the header. So as you can see it's relatively simple code. Obviously any class or ID names are optional for CSS styling. Next up comes the 'post.hbs' file. Which is mostly similar, but with a few additions and modifications. /">← Go Back {{title}} by {{author}} {{date format='DD MMM YYYY'}} {{content}} {{#if tags}} Tags: {{tags separator=" . "}} {{/if}} Share: {{#if author}} About the Author {{#if author.image}}
So to explain what's happening, the very first line is essential to the theme and tell us that this file will be inserted into the content area into the default file. The second line then inserts our header. Instead of putting it into this file we'll create a partial file later in the 'partials' directory. HBS files are just like HTML files in which you can include normal HTML elements. So the next element in the file is a which will hold all of our main content. Then inside of the repeater we'll put our article element that will contain the post. Inside each there will be a with the title and the meta data of the article (author and publish date). After that the actual excerpt. Then a that has our post's tags (in between an 'if' statement) and the share links, with some span's calling in our icon font. Finally we have some pagination, and we eventually call in the which works like the header. So as you can see it's relatively simple code. Obviously any class or ID names are optional for CSS styling. Next up comes the 'post.hbs' file. Which is mostly similar, but with a few additions and modifications. /">← Go Back {{title}} by {{author}} {{date format='DD MMM YYYY'}} {{content}} {{#if tags}} Tags: {{tags separator=" . "}} {{/if}} Share: {{#if author}} About the Author {{#if author.image}}
So to explain what's happening, the very first line is essential to the theme and tell us that this file will be inserted into the content area into the default file. The second line then inserts our header. Instead of putting it into this file we'll create a partial file later in the 'partials' directory. HBS files are just like HTML files in which you can include normal HTML elements. So the next element in the file is a which will hold all of our main content. Then inside of the repeater we'll put our article element that will contain the post. Inside each there will be a with the title and the meta data of the article (author and publish date). After that the actual excerpt. Then a that has our post's tags (in between an 'if' statement) and the share links, with some span's calling in our icon font. Finally we have some pagination, and we eventually call in the which works like the header. So as you can see it's relatively simple code. Obviously any class or ID names are optional for CSS styling. Next up comes the 'post.hbs' file. Which is mostly similar, but with a few additions and modifications. /">← Go Back {{title}} by {{author}} {{date format='DD MMM YYYY'}} {{content}} {{#if tags}} Tags: {{tags separator=" . "}} {{/if}} Share: {{#if author}} About the Author {{#if author.image}}So to explain what's happening, the very first line is essential to the theme and tell us that this file will be inserted into the content area into the default file. The second line then inserts our header. Instead of putting it into this file we'll create a partial file later in the 'partials' directory. HBS files are just like HTML files in which you can include normal HTML elements. So the next element in the file is a which will hold all of our main content. Then inside of the repeater we'll put our article element that will contain the post. Inside each there will be a with the title and the meta data of the article (author and publish date). After that the actual excerpt. Then a that has our post's tags (in between an 'if' statement) and the share links, with some span's calling in our icon font. Finally we have some pagination, and we eventually call in the which works like the header. So as you can see it's relatively simple code. Obviously any class or ID names are optional for CSS styling. Next up comes the 'post.hbs' file. Which is mostly similar, but with a few additions and modifications. /">← Go Back {{title}} by {{author}} {{date format='DD MMM YYYY'}} {{content}} {{#if tags}} Tags: {{tags separator=" . "}} {{/if}} Share: {{#if author}} About the Author {{#if author.image}}So to explain what's happening, the very first line is essential to the theme and tell us that this file will be inserted into the content area into the default file. The second line then inserts our header. Instead of putting it into this file we'll create a partial file later in the 'partials' directory. HBS files are just like HTML files in which you can include normal HTML elements. So the next element in the file is a which will hold all of our main content. Then inside of the repeater we'll put our article element that will contain the post. Inside each there will be a with the title and the meta data of the article (author and publish date). After that the actual excerpt. Then a that has our post's tags (in between an 'if' statement) and the share links, with some span's calling in our icon font. Finally we have some pagination, and we eventually call in the which works like the header. So as you can see it's relatively simple code. Obviously any class or ID names are optional for CSS styling. Next up comes the 'post.hbs' file. Which is mostly similar, but with a few additions and modifications. /">← Go Back {{title}} by {{author}} {{date format='DD MMM YYYY'}} {{content}} {{#if tags}} Tags: {{tags separator=" . "}} {{/if}} Share: {{#if author}} About the Author {{#if author.image}}So to explain what's happening, the very first line is essential to the theme and tell us that this file will be inserted into the content area into the default file. The second line then inserts our header. Instead of putting it into this file we'll create a partial file later in the 'partials' directory. HBS files are just like HTML files in which you can include normal HTML elements. So the next element in the file is a which will hold all of our main content. Then inside of the repeater we'll put our article element that will contain the post. Inside each there will be a with the title and the meta data of the article (author and publish date). After that the actual excerpt. Then a that has our post's tags (in between an 'if' statement) and the share links, with some span's calling in our icon font. Finally we have some pagination, and we eventually call in the which works like the header. So as you can see it's relatively simple code. Obviously any class or ID names are optional for CSS styling. Next up comes the 'post.hbs' file. Which is mostly similar, but with a few additions and modifications. /">← Go Back {{title}} by {{author}} {{date format='DD MMM YYYY'}} {{content}} {{#if tags}} Tags: {{tags separator=" . "}} {{/if}} Share: {{#if author}} About the Author {{#if author.image}}So to explain what's happening, the very first line is essential to the theme and tell us that this file will be inserted into the content area into the default file. The second line then inserts our header. Instead of putting it into this file we'll create a partial file later in the 'partials' directory. HBS files are just like HTML files in which you can include normal HTML elements. So the next element in the file is a which will hold all of our main content. Then inside of the repeater we'll put our article element that will contain the post. Inside each there will be a with the title and the meta data of the article (author and publish date). After that the actual excerpt. Then a that has our post's tags (in between an 'if' statement) and the share links, with some span's calling in our icon font. Finally we have some pagination, and we eventually call in the which works like the header. So as you can see it's relatively simple code. Obviously any class or ID names are optional for CSS styling. Next up comes the 'post.hbs' file. Which is mostly similar, but with a few additions and modifications. /">← Go Back {{title}} by {{author}} {{date format='DD MMM YYYY'}} {{content}} {{#if tags}} Tags: {{tags separator=" . "}} {{/if}} Share: {{#if author}} About the Author {{#if author.image}}